Balanced Draught: Harnessing for comfort and efficiency
This article was published in the April 2008 edition of "Carriage
Driving Magazine" (UK). Copyright 2008 Sue Millard. Much of the information
here is also available in Barb Lee's Book "Understanding Harness".
There is a Further Reading list at the end of this article.
NB – where comments have been made that may appear critical of the turnout in a photograph, the drivers’ faces have been obscured to save embarrassment! Click on any image to see a larger version.
No matter what type of carriage driving we do, harness is something we’ve all got to have, or our carriage is completely useless. Through the first half of the nineteenth century, harnessing became increasingly efficient because driven horses provided our fastest means of transporting large numbers of people and goods.
Today, it is only our sporting interests that demand equine speed, whether for cross country work, long distance, showing or just leisure – and I wonder if we still know whether our horses are harnessed in the best and most comfortable way.
Efficiency isn’t just making sure that the straps and equipment don’t cause injury. Modern harnesses, like modern carriages, have moved toward lightness, with many leisure and competition products based on synthetic strapping. Toughness, cheapness and ease of cleaning are all very well, but the horse and his mechanics, and the laws of physics, have not changed. Has the new technology obscured some basic facts which we still ought to take into account?
Let’s look at the principles of draught. We want the horse’s forward motion to be transferred to the carriage behind him. For convenience we say he “pulls” it, but in fact he pushes into a padded piece of harness. Now, how should we decide where we put this pressure on the horse?
Let's imagine for a moment that it is not a horse that is going to pull the object, but a human. Suppose we have a stack of of hay bales on a sledge and we are going to pull the sledge using a rope tied from the two front corners, making a big loop. If we hold this loop of rope in front of our shoulders and walk forward, our movement is indeed transferred to the sledge; but it will be very hard work. It will choke us, and we'll feel we are being pulled over backwards.
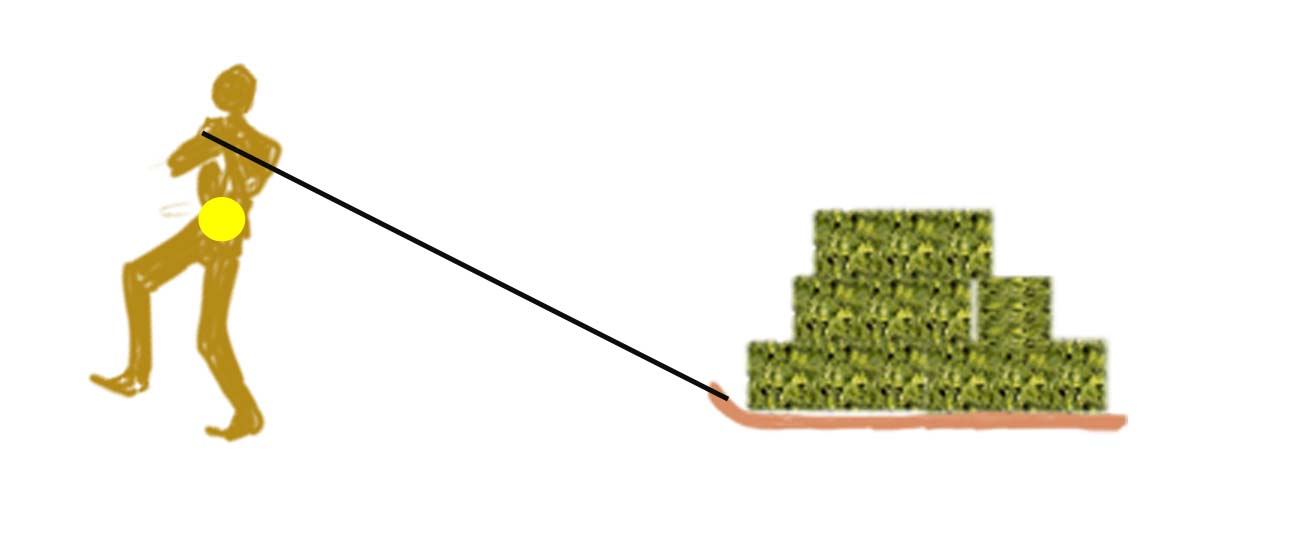
Diagram 1: Pulling from too high a point will choke us, and we'll feel we are being pulled over backwards.
If on the other hand we put the rope around our shins and walk forward, the movement again will move the sledge, but it will be very very hard work. It will be painful, because shins move a lot and have very little fleshy padding; worst of all we will tend to fall forwards over the rope.
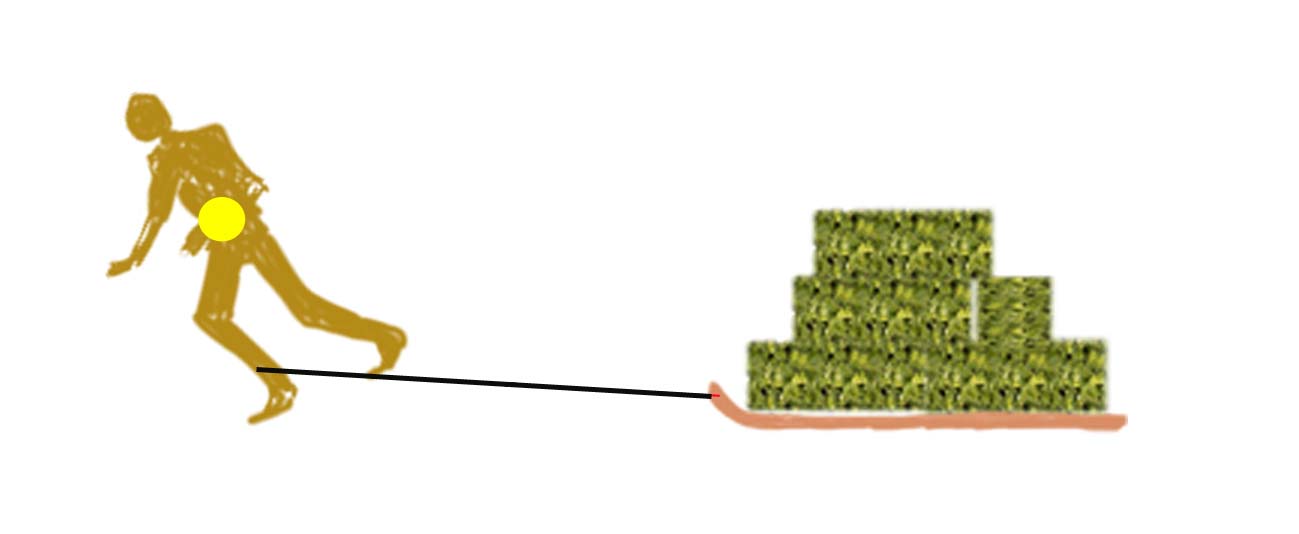
Diagram 2: pulling from too low a point, we will tend to fall forwards over the rope
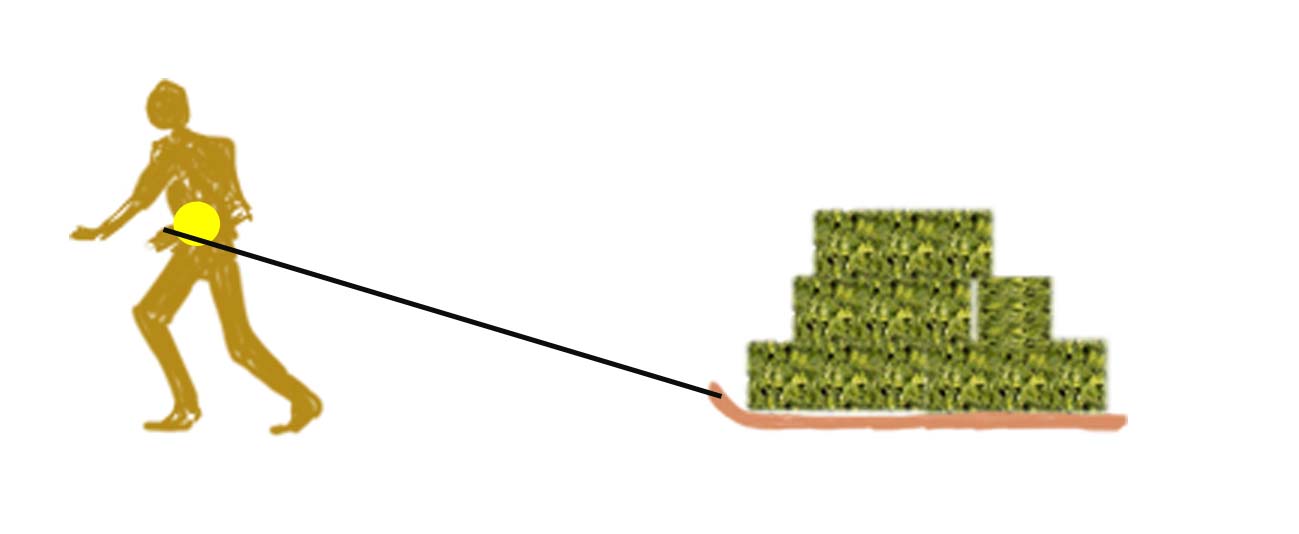
Diagram 3: it's only when we hold the rope at our centre of gravity that we can move the load comfortably and efficiently.
There is a wide range of places where we might test the draught, between head and feet, but it's only when we hold the rope at our centre of gravity that we can move the load comfortably and efficiently.
We have to draw the weight of the load through our own centre of gravity, so that we remain in balance.
Unfortunately, the horse's body is parallel to the ground, not vertical like ours. There is only a limited range of places where we can apply equipment for pulling.
The breast collar around the chest is widely used:
Breast collar
The rigid, padded neck collar has various forms.
Neck collar
The traditional English collar is leather stuffed with rye straw and has alloy or steel hames cased in brass, while the Scandinavian collar has padded wooden or steel hames:
Swedish collar
In the past there were sprung collars, elastic collars, even inflatable collars, and zinc-coated steel split collars were used by the Victorian fire services. Lately there have been further developments with V shaped breast collars of varying depth, and the combined breast and neck-collar “brollar” or French collar.
Without going into the merits and otherwise of all these pieces of equipment, let's put our knowledge of the ideal draught point on a human into studying harness draught lines on a horse.
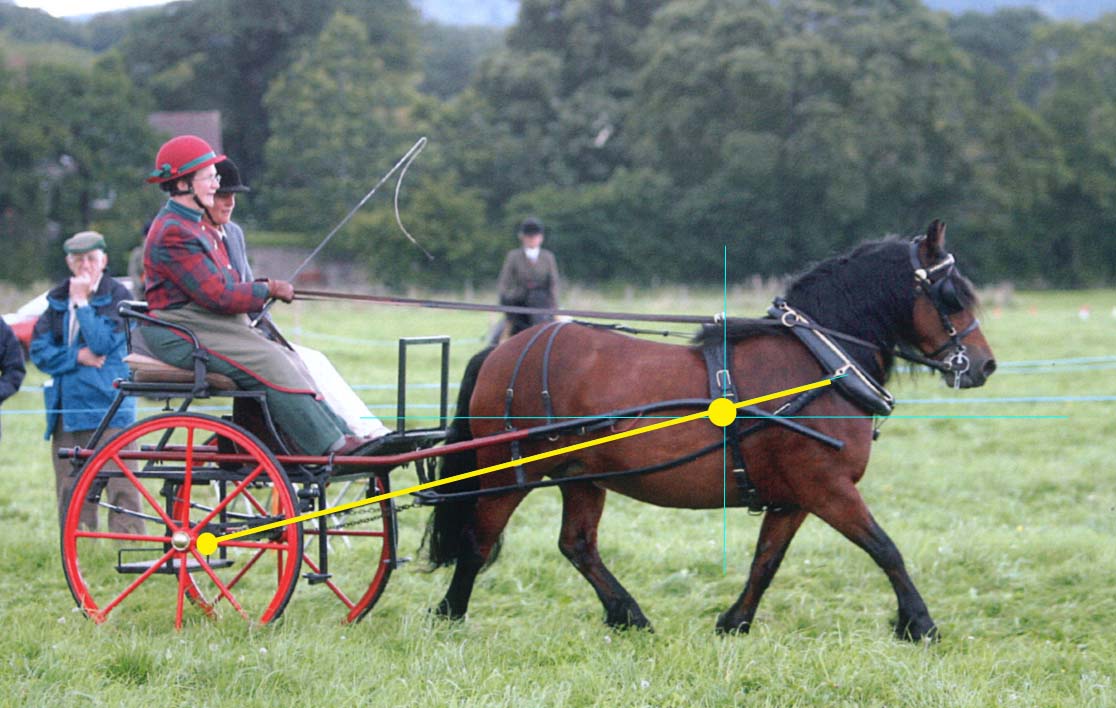
To keep his own body in balance he should draw the weight of the load through his own centre of gravity: the horse's centre of gravity is roughly half-way up his girth and one third of the way along his barrel.
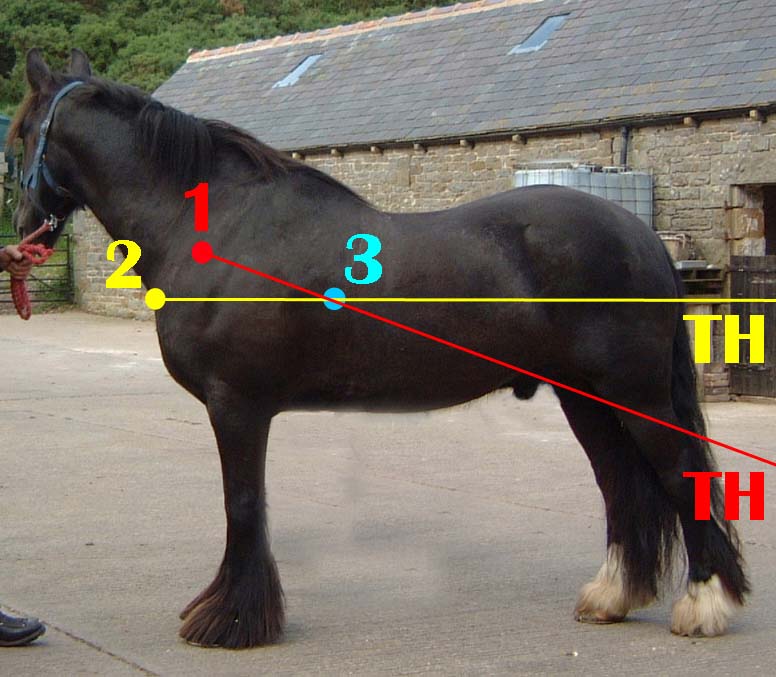
“Balanced draught” lines on the horse - photo 4: 1 - draught point for full collar. 2: Draught point for breast collar. 3: centre of gravity. TH = Trace Hook position. Line 2 - 3: draught line for breast collar. Line 1 - 3: draught line for neck collar. (Dales X gelding belonging to Charlie Parker’s Working Dales Pony Centre)
A breast collar can't be fitted higher than the junction of the windpipe, because we don't want to choke the horse; or lower than the point of the shoulder where there’s a sharp point of bone that moves a lot. From the breast collar our balanced draught line, through the horse's centre will run out roughly parallel to the ground. (Line 2 – 3) The trace hook position (TH) will ideally be high.
From a neck collar, which places the pull over the part of the shoulder blade that moves least, our balanced draught line through the horse's centre slopes towards his hocks. (Line 1 – 3). The trace hook position will ideally be low.
I’m not saying that either of these lines is better than the other. I’d just like you to look at the different lines of draught for the horse wearing the breast collar and the full collar, applying the principle of “balanced draught”.
So far though, we haven't looked at the other end of the business, the position of the trace hook on the vehicle. This will also have a bearing on the type of collar that you should use.
High trace hooks
On a two wheeler the balanced draught line may be quite high, in line with the shafts. Assuming that the cart fits the horse, the trace line produced by using a breast collar will match the balanced draught line, that promotes comfort and efficiency.
Photo 5: a basic exercise cart with high trace hooks, and breast collar harness - the trace line matches the balanced draught line.
The horse can push into the breast collar and his full weight is aligned with the draught line of the load. Some horses do object to the squeezing action of a breast collar, but most should work well and happily in this setup. You must provide a swingletree to accommodate his shoulder movement if you use a breast collar.
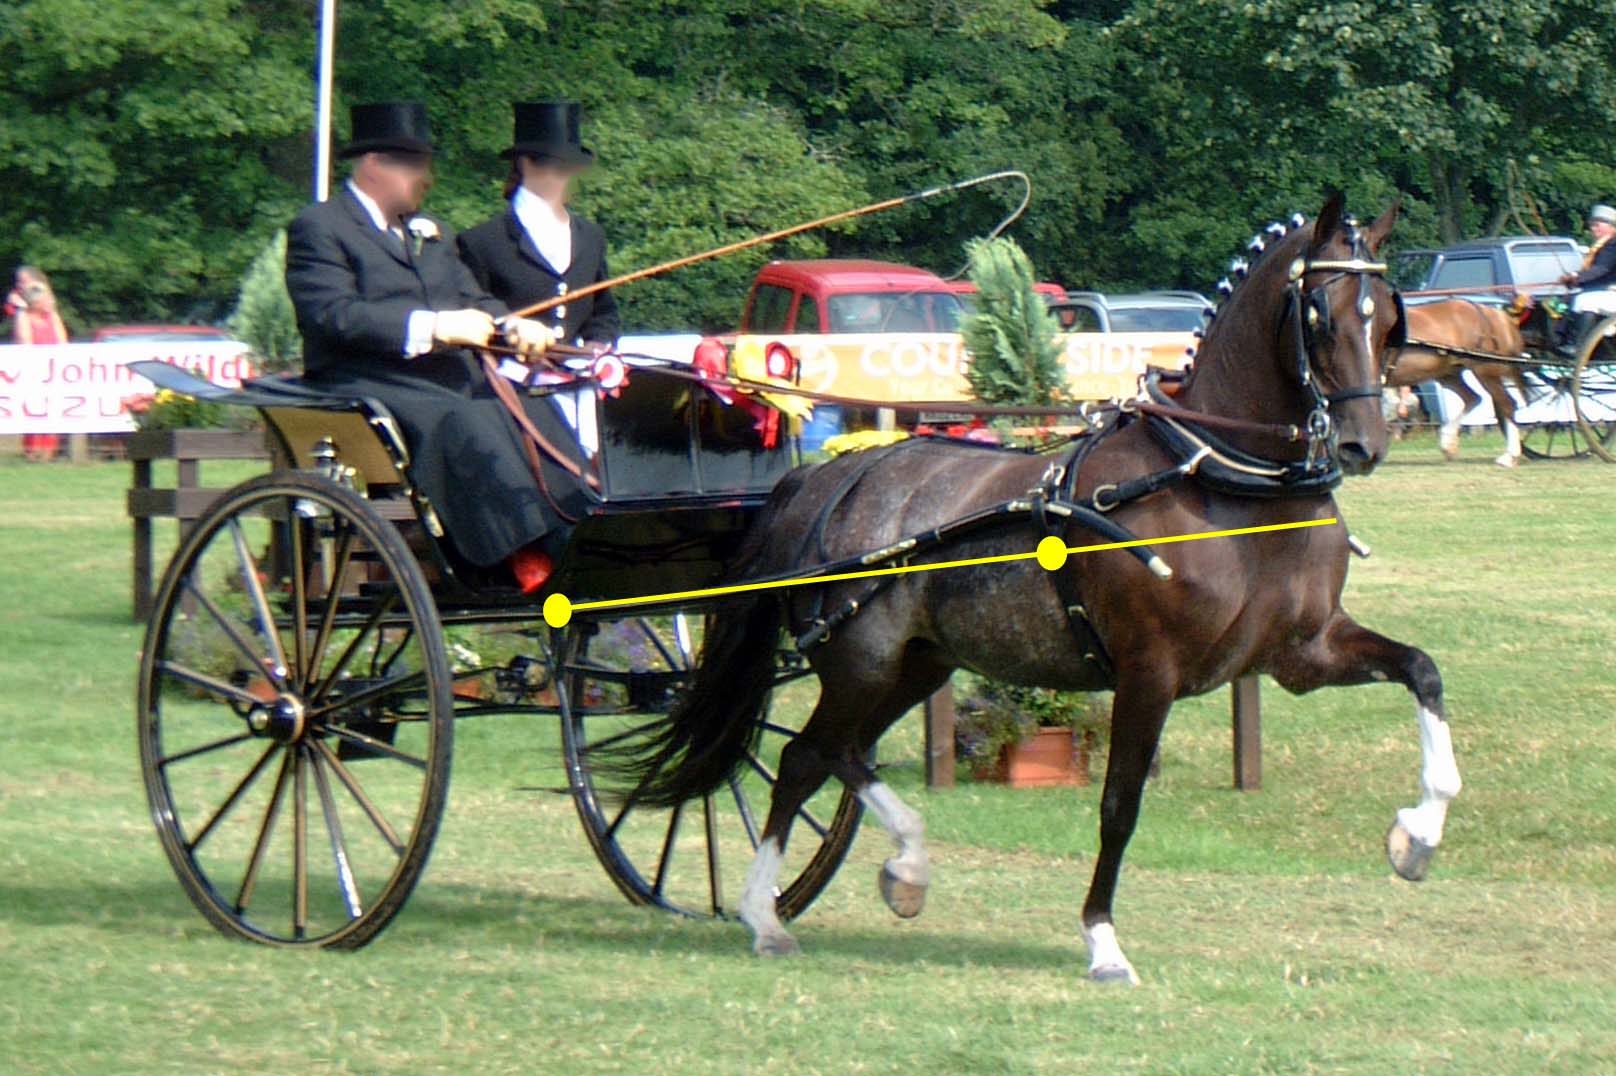
Photo 6: neck collar with high trace attachment; trace line goes above the natural balanced draught line (yellow).
This is less common in British turnouts than those where the draught line is normally high, such as buggies in North America.
A full neck collar on a horse working with a vehicle with high trace hooks is not going to be very comfortable; the draught line will be too high and like the human who was being pulled over backwards in Figure 1, the horse can’t get his body centrally into the load. The problem is compounded when a horse has a very sloped shoulder and high action.
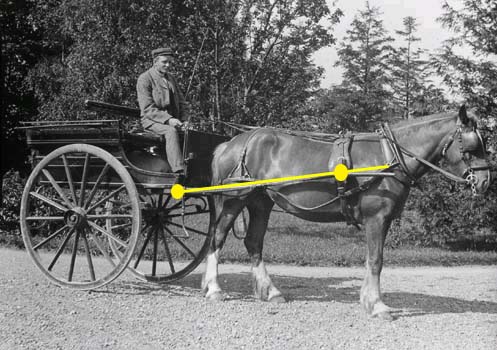
Photo 7: Light high cart of about 1908, with high trace hooks, and a neck collar on straight shouldered horse. The trace line correctly matches the balanced draught line, although the neck collar looks tight.
Compare photo 7 to the gig in photo 6: which has the same trace hook position and neck collar, but this horse has a straighter shoulder. The cart is also higher than the gig in photo 6. The trace line matches the balanced draught line.
Low trace hooks
On the other hand, if the vehicle is a two wheeler with a low trace attachment, such as chain draught to the axle, or if it is a four wheeler, then a breast collar set-up is not going to work nearly so well.
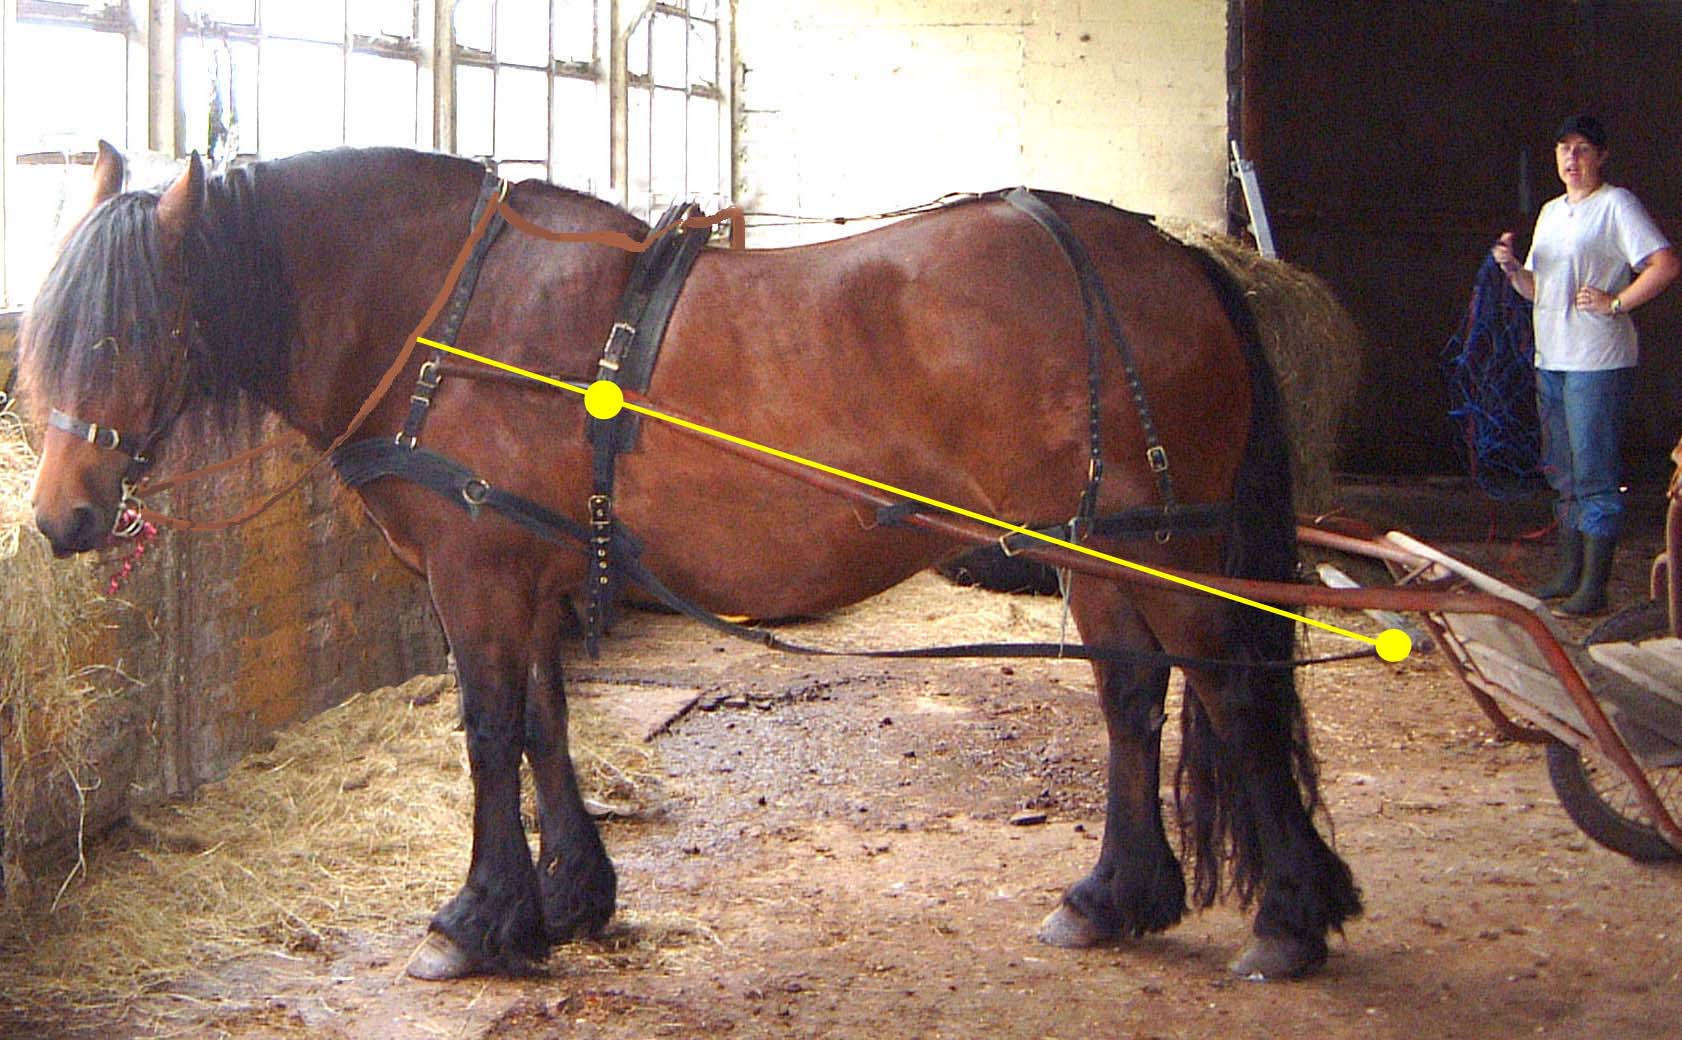
Photo 8: Breast collar and low trace attachment - the trace line is much too low and does not go anywhere near the natural balanced draught line (yellow).
Although the shafts look right in photo 8, the cart is too small, which makes the problem worse. This pony was in training, being accustomed to the shafts, and was supervised. You should never tie and leave a horse alone in a carriage. The draught line runs too low, so like the human with the rope around the shins, the horse is “falling over” the pull of the load. A cart that is too small, like this one, makes this problem worse.
The solution is to use a neck collar with the draught point over the “sweet spot” of the shoulder blade. My own ponies work in neck collars, but that is because the vehicles I use now all have “axle draught”, which means the swingletree pulls via a pair of chains directly to the axle.
Horses working hard in forestry or agriculture, pulling heavy logs or implements with trace attachments near ground level, will normally be wearing a full collar. It is the only efficient way to harness for this kind of work.
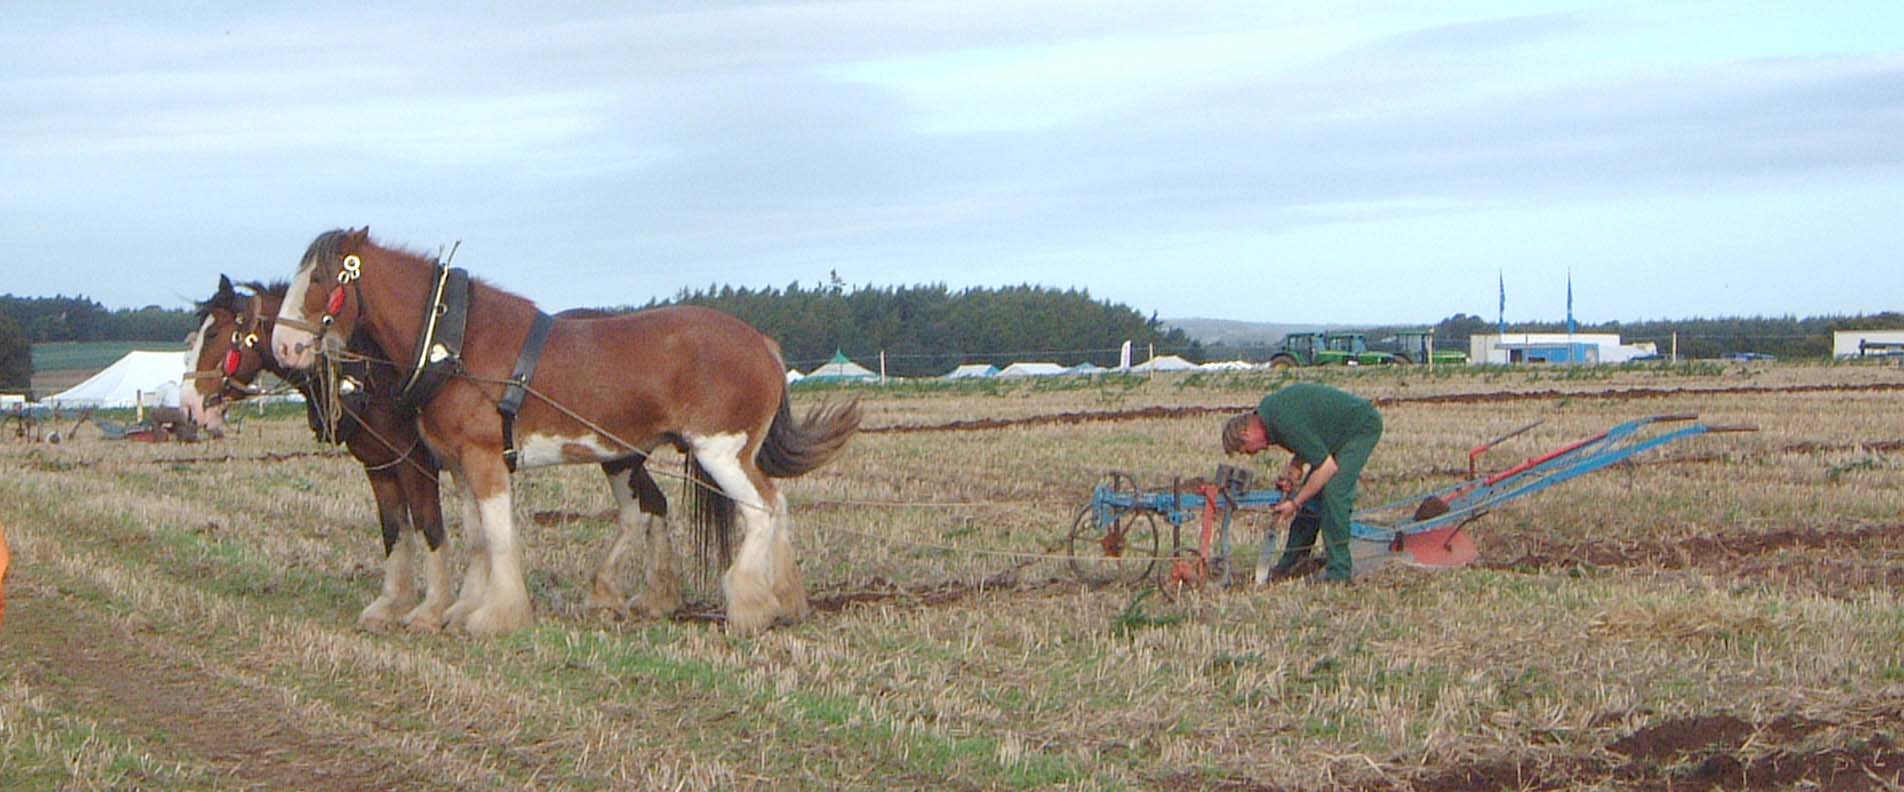
Photo 10: plough team at National Ploughing Championships; neck collars enable the draught line to run correctly through the centre of gravity and down to the plough. When pulling, this pair will be much further from the plough.
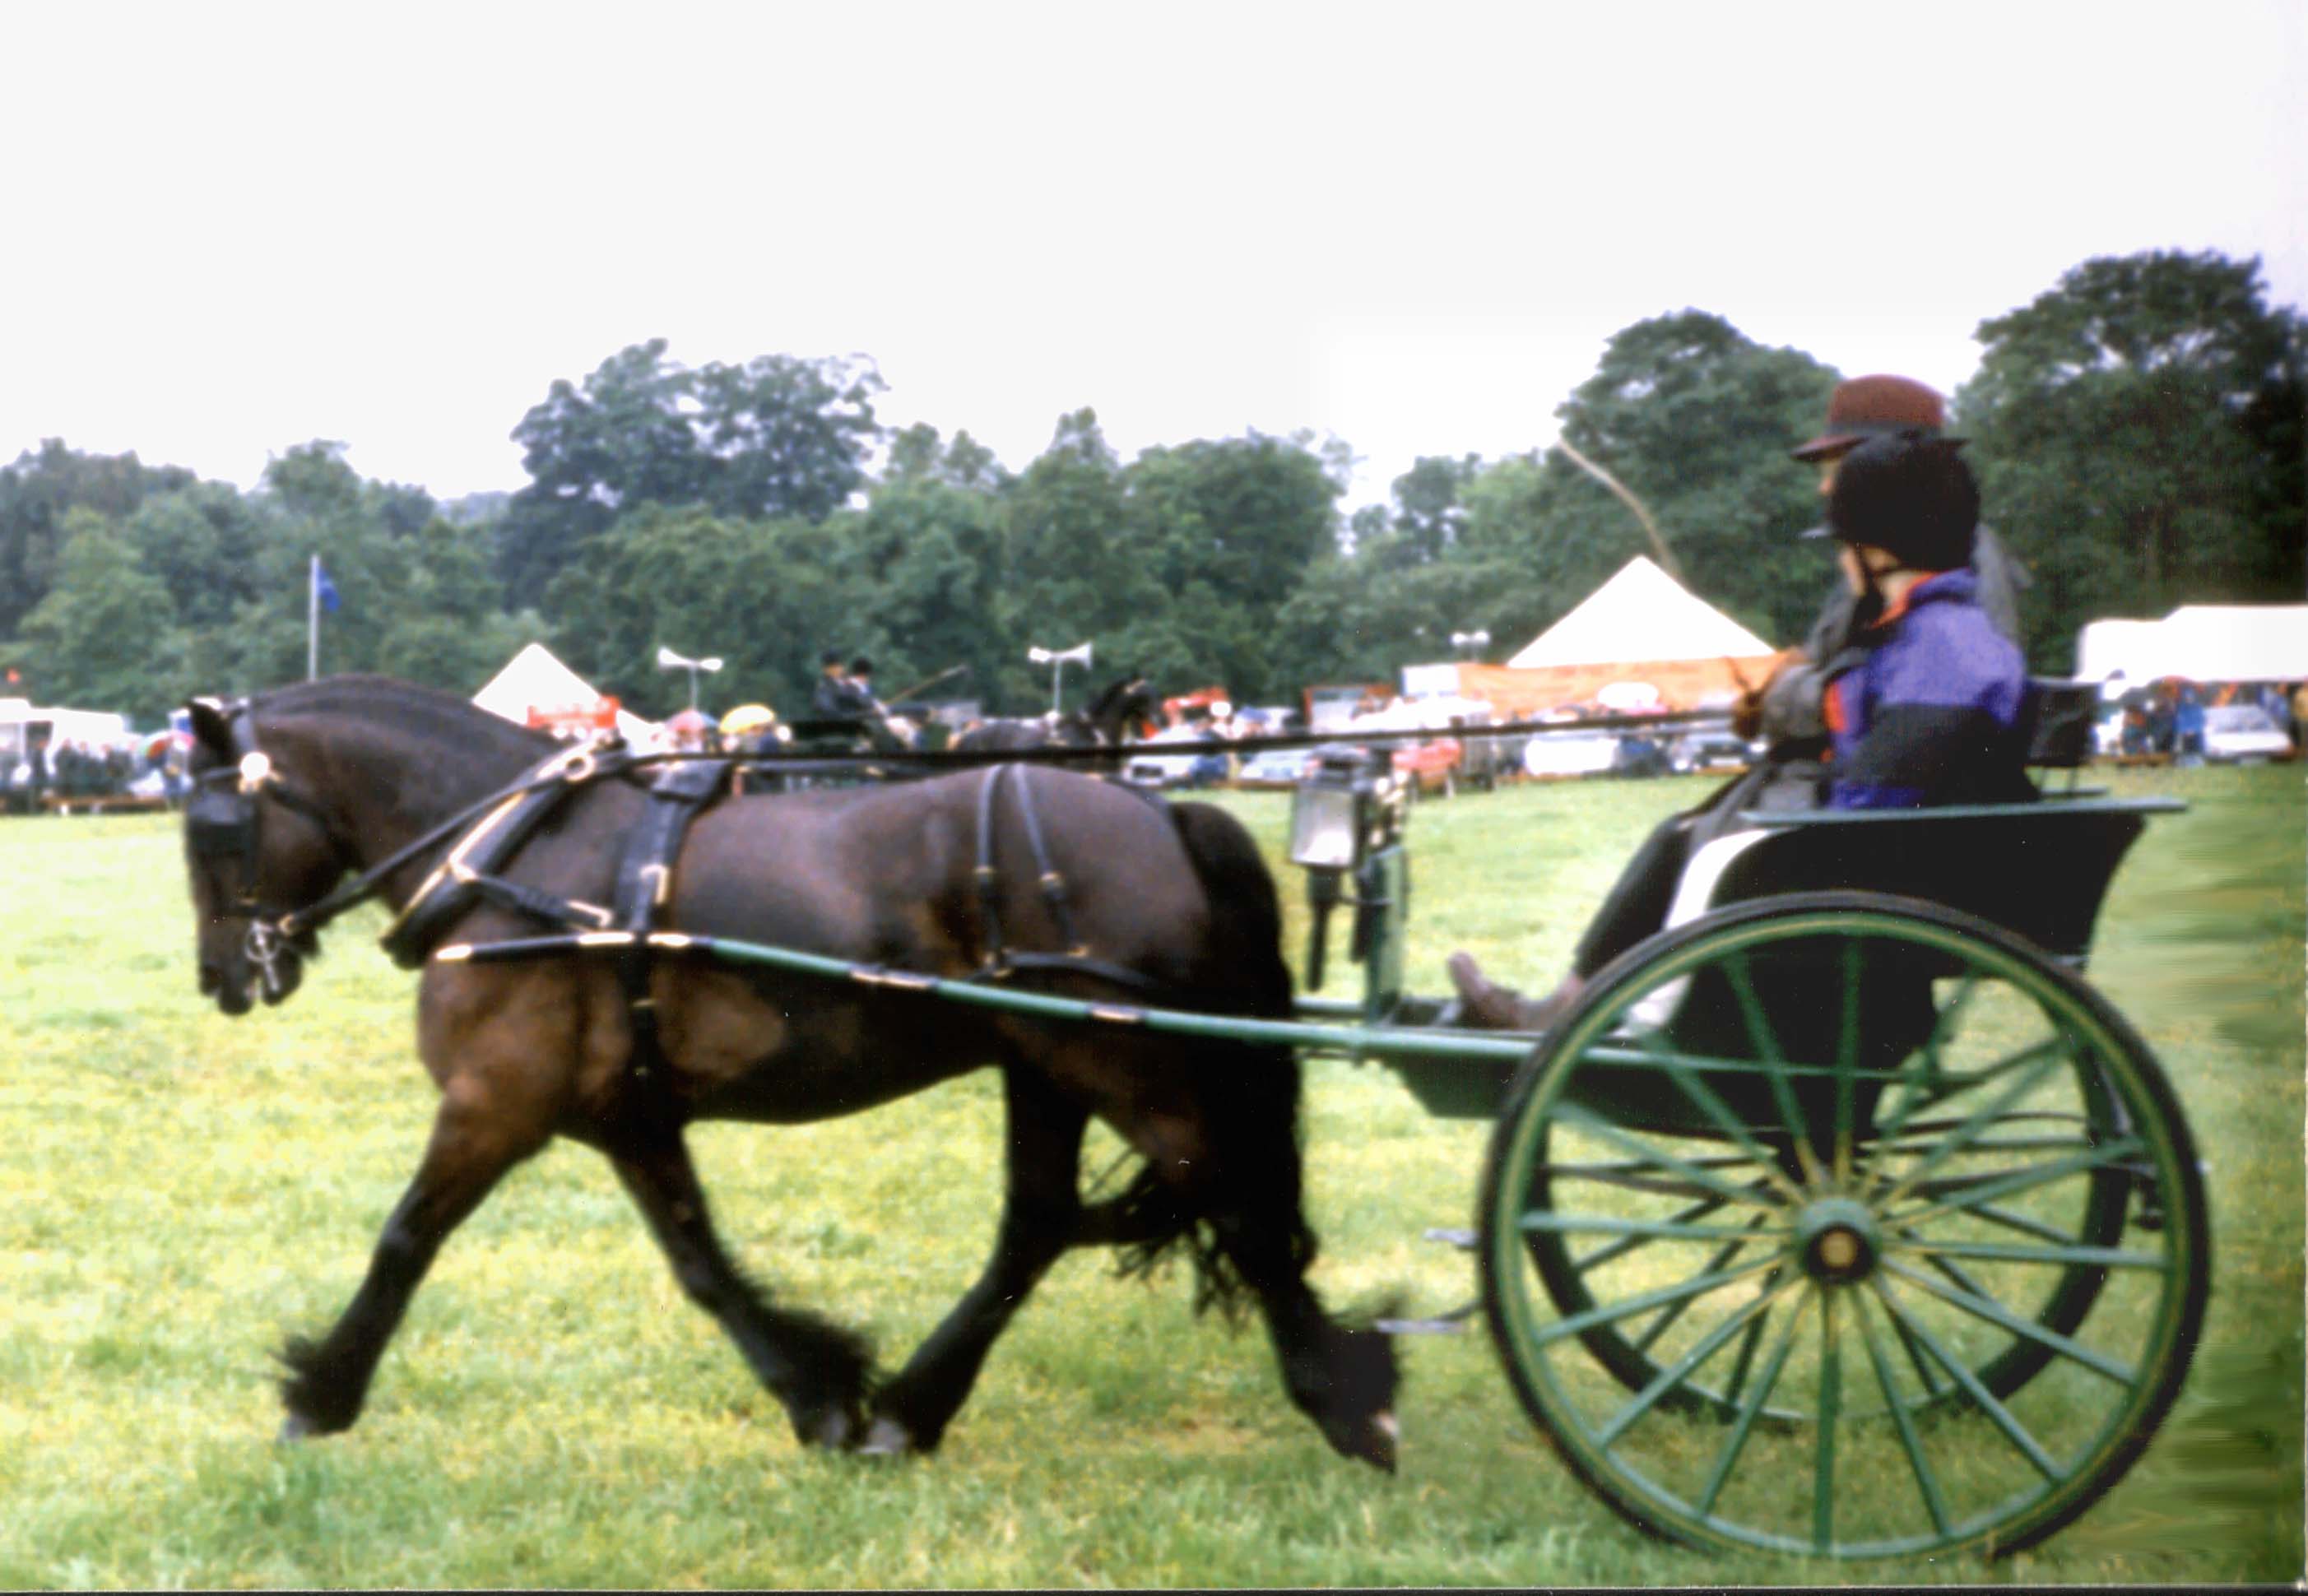
Pairs harness is much more definite about the trace line coinciding with the balanced draught line, and puts the pair tug buckles fractionally lower than the centre of gravity, so that they rise and remove all pressure from the pad when the horses are in draught.
Photo 11: the trace line coinciding with the balanced draught line.
On a four wheeler the draught line should not go directly to the front axle or it would try to lift the fore part of the carriage. The draught line needs to run somewhere between the front and rear axles, in order to pull the vehicle along rather than upwards. The coach horses, photo 12, are harnessed in accord with the principles of balanced draught.
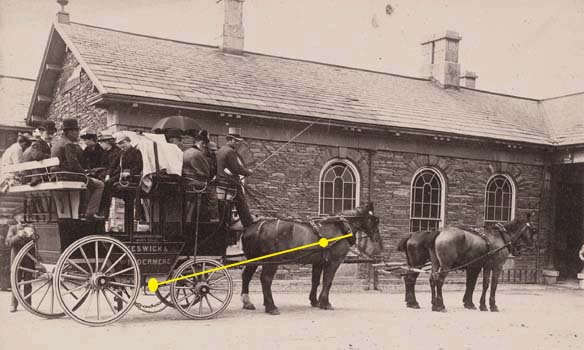
Photo 12: The coach horses are harnessed in accord with the principles of balanced draught.
The competition turnout in photo 13, on the other hand, would work more easily with a neck collar.
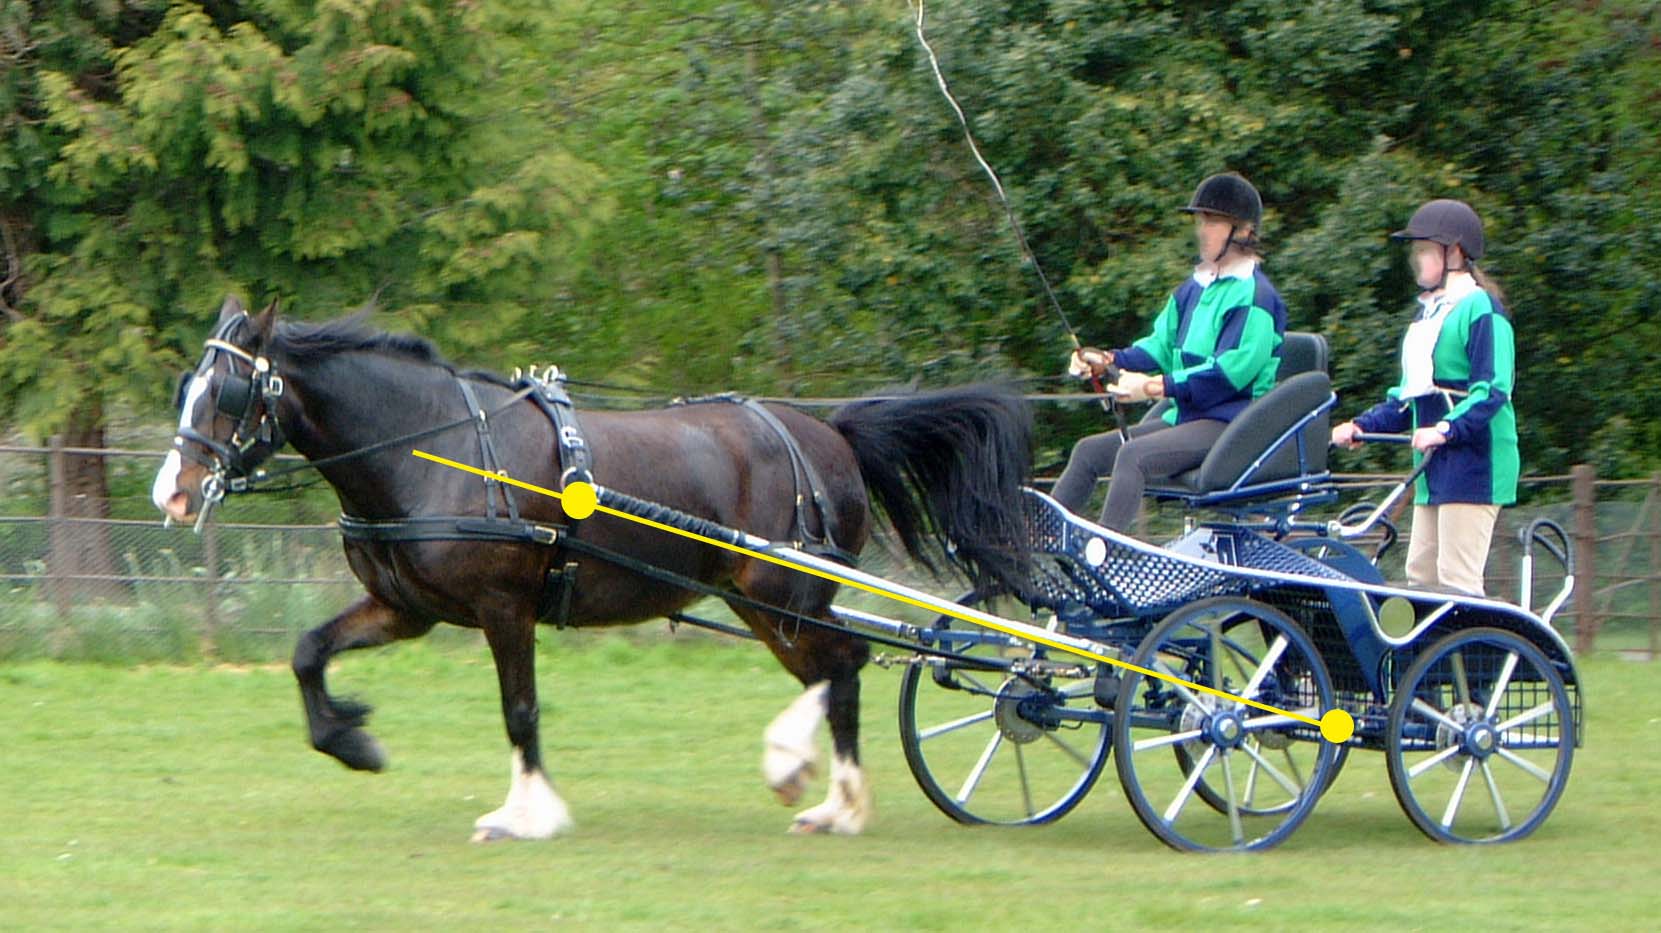
Photo 13: Competition 4 wheeler whose trace line doesn't coincide with the balanced draught line.
Many sporting turnouts’ trace lines diverge even more than this; they “break” at the neck strap and change direction downwards, putting a painful drag on the neck strap at the withers, where there should be no pressure.
Not "reinventing the wheel"!
Balanced draught is not a new idea by any means. It was described in the ninenteenth century by Dwyer and by Youatt, and more recently by Barb Lee (see the reading list at the end). However, it is something we too often forget when setting up our horses for driving. I’m not exclusively recommending breast collars, nor exclusively neck collars. Nor am I saying that the old timers always got it right and the competitive drivers get it wrong; there are saints and sinners in both worlds!
By using the principles of balanced draught you can suit the harness to the carriage and its trace attachment point. This is going to make life easier for your horse no matter what discipline you’re working in. A horse who is feeling an inequality in the draught is going to be distracted to a greater or lesser degree, so if you can remove that distraction you are going to have better communication and be safer when driving. Consider also the effect of savings in efficiency. The effort “saved” by good harnessing might allow a horse to win a competition, instead of only being placed.
Look through all the driving photos you can find, armed with the points I have made here. You can judge for yourself. Decide whether the horses you see in the photos are working in balance, to their best efficiency. Identify the trace hook, and hold a ruler over the picture to help visualise the line that goes from there through the horse’s centre of gravity. Does the line meet the collar at its point of draught, or miss it completely? The answer you get will often surprise you.
Practise on other people’s photos before you look at a picture of your own horse, side view, harnessed to your own carriage. Once you’ve “got your eye in”, checking with the guidelines here, you can confirm whether your own harnessing is the best it can be. If it is, all is well! If it isn’t, then by making a few carefully judged alterations, you can make life a lot easier for your horse. When you see how much more happily he can work, you will know you’ve done the right thing. And if your harnessing does indeed conform to balanced draught, you’ll know a bit more about why it works.
Further Reading
Hobbs, S, 2000: Draught testing of a work horse, Draught Animal News,
Number 33, December 2000. Centre for Tropical Veterinary Medicine, University
of Edinburgh.
Lee, B, 2004: Understanding Harness. Self Published.
Youatt, W, 1832: The Horse, with a Treatise on Draught. Longman & Co.
Sue Millard is a member of the North West Driving Club on whose committee she has served at various times as Chairman, Secretary, Treasurer and now as Vice President. All the diagrams and modern photographs are the copyright of Sue Millard or the present NWDC secretary, Jen Bernard.